导言:
本篇主要开发了2个版本的辅助程序。
- LLK_1.0是基于
C++开发的使用的opencv中自带的直方图相似进行分类。 - LLK_2.0是基于
Python开发的,使用的Pytorch进行网络的训练,采用的网络结构是简化版的VGG
连连看辅助程序1.0
博主童年时一直被一款游戏虐待:QQGame中的连连看小游戏,该游戏给博主留下了很深的童年手残经历,在学到了一些知识后博主准备使用另一种角度去看到这款游戏:

开发环境:
- VS 2017
- OpenCV2
一. LLK_1.0 算法逻辑:
1.1 定位目标框
根据每个人的分辨率不同,连连看游戏的界面会默认出现在屏幕的正中,所以需要自己手动设置。
下面是我的屏幕信息的宏定义:
1 |
有了上面的参数就可以轻松获得到目标区域:
PS 像素点精确定位我是用画图软件看的
1.2 分割小块:
每一个小块的大小也可以测量得到:1
2
那么可以直接将刚才的目标图像(图1.2所示)分割成 11 × 19的grid每一小块是这样的: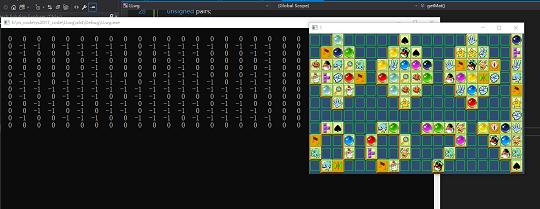

1.3 分类:
当得到11 × 19个小块后,可以采取的措施有很多种:
- 无监督学习:
SVM等,将209块分成不同的类别,然后得到分类矩阵mat,但是很显然,对于多类别(此游戏有45个不同的小块类别)这样的精度是很不够的,且分类时间过长。不是首选 - 传统识别方法:
直方图相似拐点数计数灰度图相似对于后两个方案,在拐点数量相同的图案、形状同但颜色不同的图案中的精确他很低,无法使用,所以只有直方图相似可以使用 - 深度学习方案:数据集的采集比较困难,但其预测速度和精度远高于1,2,是最优的方案。将在版本2.0中深入讨论。
在LLK_1.0中采用的是直方图相似来分类209块图像
1 | std::queue<ansPPair> getMat() { |
代码中有些地方可能会有疑问:
- 循环为什么是
13×21?
1 | for (int i = 0; i < 13; i++) { |
解答: 刚开始我以为处于边界的两个相同块是可以在高于边界处相互消掉的(如图1.4所示),但是在腾讯的连连看中是没有这种机制的,我将在2.0中进行修改。
- 这个for 45 次迭代是干嘛的?
1 | for (int i = 1; i < 45; i++) |
解答: 我采取的方法不是将209个图像两两依次比较这样会比较209 × 209次。如果有一个本地不同的45张图的数据集,来依次匹配的话只用匹配45 × 11 × 19次就可以得到分类矩阵。
我会在我的Github上提供1.0的数据集:
- 另外需要指出的是:
我先使用拐点探测处背景再来分类的,因为背景就是蓝色的那个小块,可以很快的得到。
求解
分类完成后就可以对mat分类矩阵进行连连看算法的求解了。
两个点之间是否可以相消主要的判断方法:
逻辑很简单,依次检测水平,竖直、中间节点数为1、中间节点数为2的情况。1
2
3
4
5
6
7
8
9
10
11bool detect(MatLL & mat, PointLL & oriPoint, PointLL & targPoint) {
if (detect_horizen(mat, oriPoint, targPoint))
return true;
if (detect_vertical(mat, oriPoint, targPoint))
return true;
if (detect_oneNode(mat, oriPoint, targPoint))
return true;
if (detect_twoNode(mat, oriPoint, targPoint))
return true;
return false;
}
注意的是,上述的检测是有顺序的!,当执行下一个检测时,要确保两点之间无法通过之前的检测进行消除。
中间节点数为1:1
2
3
4
5
6
7
8
9
10
11
12
13
14
15
16
17
18
19bool detect_oneNode(MatLL & mat, PointLL &oriPoint, PointLL & targPoint) { //经过一个点是否可以到达另一个点。
// find if there's connection through one Node
//方法。这个bridgeNode 肯定在其目标点与源点的矩形角上。有两个桥点分开判断。
//所以要确保不在水平,以及竖直方向有解。即确保矩形的高不为0.
if (oriPoint.x == targPoint.x || oriPoint.y == targPoint.y)
return false;
if (!OCUP(oriPoint.x, targPoint.y)) { //如果bridge点可达,那么只要桥店可以再通过一次水平或竖直到底目标点那么可消。
PointLL bridgeNode1 = PointLL(oriPoint.x, targPoint.y,0);
if (detect_vertical(mat, bridgeNode1, oriPoint) && detect_horizen(mat, bridgeNode1, targPoint))
return true;
}
if (!OCUP(targPoint.x, oriPoint.y)) {
PointLL bridgeNode2 = PointLL(oriPoint.y, targPoint.x,0);
if (detect_horizen(mat, bridgeNode2, oriPoint) && detect_vertical(mat, bridgeNode2, targPoint))
return true;
}
return false;
//
}
中间节点数为2:1
2
3
4
5
6
7
8
9
10
11
12
13
14
15
16
17
18
19
20
21
22
23
24
25
26
27bool detect_twoNode(MatLL & mat, PointLL &oriPoint, PointLL & targPoint) { //经过两个拐点是否可达。
// find if there's connection between two Nodes
//这个检测比较困难。
//需要枚举桥点。
//只要桥点和源点可达,桥点和目标点可达,那么就可以消掉。
//需要注意的是如果达到方式必是 (水平或竖直+一拐点 || 一拐点+水平或竖直) 的组合方式。
//这里再一次看到必须保证能 一拐点 到的点一定要确保不能直接水平竖直 达到。
//因为如果 一拐点 也能水平竖直的话,那么在两拐点判定中,已有一个水平竖直,另一个经过一拐点返回的也是水平竖直达到方式,只能是属于一拐的,而不是二拐点。
for (int i = 0; i < MATYROW; i++) {
for (int j = 0; j < MATXCOL; j++) {
if (!OCUP(j, i)) {
PointLL c = PointLL(j, i,0);
if (c == oriPoint || c == targPoint) continue;
if (detect_horizen(mat, c, oriPoint) && detect_oneNode(mat, c, targPoint))
return true;
else if (detect_vertical(mat, c, oriPoint) && detect_oneNode(mat, c, targPoint))
return true;
else if (detect_oneNode(mat, c, oriPoint) && detect_horizen(mat, c, targPoint))
return true;
else if (detect_oneNode(mat, c, oriPoint) && detect_vertical(mat, c, targPoint))
return true;
}
}
}
return false;
//
}
代码我会帖子我的Github上
连连看辅助程序2.0
与1.0版本不同处:
- 将代码迁移至Python 使其符合更多的开发者选项
- 使用Pytorch进行图像分类训练
- 使用简化版Vgg16模型
- 使用GPU预测 加快了预测速度
开发环境:
- Pycharm
- Pytorch